Not everyone is trustworthy. This is the lesson I learned this week and believe me I have learned it well.
Up till now I have always been willing to happily take telephonic orders even from people I have never met in person. I know this might sound silly and naive but most of the people who phone me have been referred by a previous customer or a friend so I have never had any problems with non-payment.
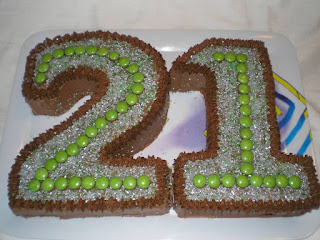
On Monday I worked for hours on two chocolate birthday cakes for a new customer, only for her to claim that she only ordered one(!!). Even though I had a friend at my house when the lady phoned to place the order and she heard me confirm all the details for the orders I realised I had no way to prove that she asked for both cakes.
At first I was really upset about it but then I decided to use this experience as a learning curve and in future anyone ordering from me for the first time will have to either sign an order form or send me a confirmation email with all the details on. No more blindly trusting people to keep their word, this is my business and I can’t afford to be nice all the time.
The silver lining was that since it was a double-digit cake, I sent half over to my friend's house and both our families got rich chocolate cake for desert. The kids all loved it and the next morning I got another order for a cake from one of my previous customers, so that made me feel all better again.
Pull up a chair and let us talk about cakes, cupcakes, adventures and misadventures
Jun 30, 2010
Jun 28, 2010
Wedding cake and surprises
Friday was a busy, busy day. I had my first official order for a wedding cake, as well as 40 cupcakes (vanilla, lemon and chocolate) for a charity tea party and a carrot cake to make.
The only hiccough was that my oven seems to be on a go-slow and instead of the normal 35 minutes per cake was taking up to an hour to cook one cake batter. The result of this was that I had long periods where I had to just sit and wait for the cakes to bake and it was driving me nuts. I really felt that I wasted a lot of time on Friday and will have to find a way to manage my time better so that I have something productive to keep me busy while I’m waiting.
I finished the wedding cake and last of the cupcakes at 12:30am and the carrot cake I did early on Saturday morning. I was pooped but also very happy with the results. I still have a lot to learn but I think overall everything turned out well, the most important part is that everyone was very happy with their orders.
I got a call late on Saturday afternoon from the lady who ordered the cupcakes to say that everyone at the charity tea loved them - and that she will be ordering more and will gladly recommend me to others. To me that is the best reward, I love to bring a smile to people with my baking.
Surprise gift
On Friday afternoon my darling hubby came home with a beautifully-wrapped gift just for me. I was so surprised (it was not even my birthday) this was just a I-love-you and-believe-in-your-business gift. I was over the moon when I opened it and found a brand new Salter Dome Scale. It's brilliant -it measures grams, ounces, milliliters and fluid ounces. I love it and have been using it all weekend.
Years ago I got my first digital food scale as a gift from my Mother-in-law. I loved the ease and accuracy with which it would measure out ingredients and together we have baked untold amounts of cake, cookies, cupcakes and other treats. A few weeks back my old friend just refused to work, at first I was not too worried, I assumed it just needed a new battery. Well, after three new batteries and a frantic search for error codes on the internet, I finally had to admit that it was hopeless and that this was the end of our partnership.
Since then I have been using an old spring scale, which has been giving me a real headache. You can weigh the same amount of flour three times and you will get three different readings. I knew I would have to buy a new scale eventually but I just don't like spending money on myself - besides I was still holding on to the hope that I could somehow fix my old scale.
Then my knight in shining amour came home with my beautiful new scale and I can once again bake with ease. I am very spoiled indeed – will have to bake him something yummy to say thank you.
Jun 25, 2010
One proud mamma
This week has been amazing, I got six different cake orders - three for this Saturday, two for Tuesday next week and then the last one still has to confirm the date.
The one I am most excited about is my first official wedding cake that I am making for Saturday. I have had fun planning it and now it’s in the oven baking, I just hope all goes well and that the bride-to-be will be happy with it.
I will post an update with pics once it’s all done.
Have to brag
Both my kids, Lollipop (10) and Mini-Chef (12), have always loved helping out in the kitchen, but lately they have become more insistent on wanting to bake 'on their own' (except for putting things in the oven - that is mom's job).
On Wednesday Lollipop decided to she was going to make oats crunchies - she took my favorite recipe, got all the ingredients together, measured and mixed it all by herself (with mom being allowed to supervise from the other side of the kitchen counter). I was only allowed near her baking when it was time to go into the oven and to take it out again.
They were delicious, not to crunchy and not to chewy - just perfect.
Mini-Chef on the other hand has been begging me to let him try and make a 3D cake for quite some time now. Yesterday was my friend's birthday and he grabbed the opportunity by offering to make her an eye-ball birthday cake.
He had a ball in the kitchen, not only did he bake a vanilla sponge cake from scratch but he also decorated it to look like an eye-ball (brown to match my friend's eyes). Everyone at her party was very impressed and now he is already planning his next creation.
I am one very proud mommy, I love to see how much joy they get from baking and cooking and I am so glad that they would both rather make something at home than to buy ready-made from a shop.
I often hear people say the art of cooking is lost on the younger generation and that they are more interested in take-aways and fast food than learning to make things for themselves. I don't think this is true, kids love to get dirty in the kitchen and try out new things, all we have to do is nurture their natural curiosity and allow them to experiment - so what if they want to make a peanut butter and Bovril sandwich with cheese? How will they ever know what flavours work well together if they are not allowed to try it for themselves?
Kids love to touch food, let them get their hands in there making a fruit salad or a batch of oats crunchies, it will build their confidence in the kitchen and make them much more willing to try out new foods if they actually helped prepare it.
Here is a recipe to get you started.
Oats Crunchies
These easy to make crunchies are always a great treat with a hot cup of coffee or tea.
Ingredients:
1 cup flour (250ml)
1 cup coconut (250ml)
2 cups oats (500ml)
1 cup sugar (250ml)
180g hard margarine
3tbs syrup (45ml)
1tsp bicarbonate of soda (5ml)
To make:
- Mix all the dry ingredients (except the bicarb) in a bowl
- Melt margarine and syrup together in a pot (or in the microwave), once melted take it off the heat and add the bicarb (it will foam up)
- Mix butter mixture into dry ingredients and press into oven proof dish
- Bake at +/- 180C for about 20 min
- Remove from oven let cool slightly and cut into squares, remove from baking dish and leave on cooling rack to cool. Keep in airtight container and hide away.
Note: For crunchier squares use slightly more margarine and for chewier squares use less margarine and more syrup.
Jun 18, 2010
Chocolate Cake
Quick and easy to make but delicious to eat, a real treat. My friend, makes this cake for birthdays and special occasions and it is always a hit.
Ingredients:
For cake
2 tbs cocoa powder
90g margarine
1 ½ cup cake flour
½ cup milk
3 big eggs
3 tsp baking powder
1 tsp vanilla essence
1 1/3 cup sugar
For chocolate butter icing
100g of butter/margarine
2 cups icing sugar
1tsp vanilla essence
3tsp milk
cocoa powder to taste
To make:
Cake
- Sift all dry ingredients together.
- Add the rest of the ingredients.
- Beat for 3 minutes with an electric beater (or a bit longer with a hand beater)
- Pour into two lined 25cm cake tins and bake for 25 to 30 min at 180C.
- Once cooled decorate sandwich together with the butter icing and decorate as you prefer
Icing
- Cream the butter/margarine, add the rest of the ingredients and mix till smooth.
- Adjust the vanilla essence and cocoa powder to taste.
Ideas :
- For something different open a tin of caramel, stir till smooth then use to sandwich the cake together.
- Crush up a mint crisp chocolate or flake to sprinkle over the top of the icing or grate some white chocolate to sprinkle over.
Jun 16, 2010
Banana bread
Since its to cold to go out here is a tea time recipe to make staying home a real treat.
This traditional tea time bread is also a great way of using up those over ripe bananas so they don’t end up in the dustbin.
Ingredients:
2 cups cake flour
1 cup sugar
120g butter/margarine
2 big eggs
1 heaped tsp baking powder
1 heaped tsp bicarbonate of soda
pinch of salt
3 or 4 very ripe bananas mashed up
To make:
- Cream butter and sugar in a large mixing bowl.
- Add the eggs and mashed bananas and stir into the butter mixture.
- Add all the dry ingredients and mix well.
- Spoon mixture into a loaf pan and bake for 1 hour at 180C.
Ideas :
- Serve slices hot or cold with some butter or cream cheese.
Jun 15, 2010
Corn Chowder
Winter has arrived in Cape Town, but I'm not really complaining, I love this kind of weather. There are many way to warm up and the only thing better than cuddling under a warm blanket with a good book or movie is a big bowl of steming winter soup or stew.
This creamy American style soup is the perfect way to warm up on a cold winters night. Served with salty crackers or chunks of fresh bread it makes a hearty main meal.
Ingredients:
250g salty pork belly cut into small cubes (or a pkt of streaky bacon)
1 onion, chopped
3 big potatoes cut into small cubes
500ml hot water (2 cups)
300g frozen sweetcorn
salt and black pepper to taste
700ml milk
2 heaped tbls all purpose flour (or cornflour)
8tbls tap water (enough water to make a smooth paste)
To make:
- Fry the pork in a big pot over a medium high heat till it has a good color then add the chopped onion and fry till the onions as soft and sweet.
- Add the cubed potatoes and hot water then cover the pot and slowly cook for about 30 to 40 minutes.
- In a cup mix the flour and water till there are no lumps then pour into the big pot and stir through.
- Add the sweetcorn and bring the soup back to the boil while stirring, cook for 3 to 5 minutes till the corn is cooked.
- Add salt and black pepper to taste.
- Add the milk and heat gently for 5 minutes but do not let the milk boil.
- Serve in big soup bowls with a sprinkle of black pepper over the top.
Note: If you prefer a thicker soup add another spoon or two of flour mixed with a bit of water to thicken the soup.
Ideas :
- For a vegetarian version leave out the pork and use vegetarian bacon bits instead.
Jun 10, 2010
Bunny Chow
To celebrate the start of the 2010 World Cup today I want to share one of my all time favorite meals, and a true taste of South Africa. Growing up in Durban the Bunny Chow (which does not contain any real bunnies) is still one of my most treasured childhood food memories.
The origin of the Bunny Chow (or just called a Bunny by locals) is still highly disputed; but what can be agreed on is that it started around Durban in the 1940s and that it is still enjoyed by all ethnic groups in SA making it a real national treasure.
To make a Bunny Chow simply take a quarter loaf of fresh white bread (or adjust the size to fit your hunger to a half loaf or even more), hollow out the inside and fill with a delicious curry of your choice. Then place the bread you took out back on top to form a hat. If you want you can sprinkle it with fresh coriander leaves, plain yogurt or tomato and onion relish (known as sambals) or just enjoy it on its own.
The way you eat a Bunny is very important, no cutlery allowed. Break pieces off the bread that was hollowed out and dip into the curry sauce to scoop up the curry bits. As the curry starts to go down, tear pieces of the bread bowl and eat with the curry.
The Bunny Chow is more than just a meal; it’s a fun way to spend time with family and friends. To me a Bunny Chow means home, it brings back the smells of Durban and happy carefree childhood memories of fun times spend with my mom and friends.
Originally only vegetable curry was used in Bunnies but today it is acceptable to use any curry of your choice. Here is my mom's basic curry recipe to get everyone started.
Basic Curry
This is a basic curry recipe but there are no measurements as it can be changed depending on taste, or what you have available in the cupboard. We have curry about twice a week and it never tastes the same!
Ingredients:
Meat (can be Lamb, Chicken, Beef, Ostrich - you decide)
Onion (finely sliced)
Curry paste (or curry spices)
Tomato puree (or diced tomatoes or tomato and onion mix)
Tomato paste
Salt to taste
*Ginger
*Garlic
*Coriander / Dhania fresh of dried
*Masala
*Bay leaves
*Curry leaves
*Ground cumin
*Tumeric
*Cinnamon
*Cardamon pods / ground
*Lemon rind
*Whole kernel corn (frozen or in can)
*Coconut milk / maas / plain yoghurt
* Optional extras but will add the real tast of Durban to any curry.
To make:
- Brown meat in a pot or pan – put aside
- Gently fry onion in a large pot.
- When soft add curry paste, ginger, garlic, masala, other spices (if using) and simmer for approx 20 min.
- Add meat and stir until it is all covered in the spices.
- Add tomato puree (or tomato and onion mix) and tomato paste and stir into the meat and spice mix. (Don’t add any water)
- Cover the pot and let simmer for at least 30min.
- About 5min before serving add the chopped coriander leaves and the coconut milk / maas / yoghurt and the corn (if using).
Note: If using lamb meat then add the salt before the tomato puree and stir it through, for any other meat add it while the curry is simmering
Jun 8, 2010
Pizza Sunday
On Sunday hubby and I were debating what to make for supper - should we have something 'special' like roast beef with Yorkshire pudding? or go for a comforting bowl of minestrone soup with crusty fresh bread to warm us up? Well the choice was obvious...we needed pizza.
Anyone who has made their own pizzas will agree that homemade pizzas are just so much better than the take away ones. They beat the store ones both in price, flavor and fun. Once you get the hang of making the dough (which is not hard) you will never want to see another take away pizza again.
Dough
1kg white bread flour (about 2.2lbs or 7 cups)
2 sachets instant dry yeast (about 20g)
1 heaped tablespoon salt (about 20ml)
2 heaped tablespoons sugar (about 40ml)
about 650ml tepid water
- Mix all the dry ingredients together in a large bowl (or on the kitchen table)
- Make a hollow in the center of the dry ingredients and add about 3/4 of the water.
- Start mixing the flour and water together with a fork adding more of the water till it all comes together enough so you can mix it with your hands.
- Kneed the dough by rolling and pushing it around (this is a great way to get rid of tension) till the dough is soft and pliable but not sticky.
- Cover with a tea towel and let it rest in a warm place till it has almost doubled in size or until you are ready to start making pizzas.
To make pizza
- 1 tin tomato puree (or tomato pasta sauce)
- grated cheese
- diced toppings of your choice
(I suggest bacon, mushrooms and green pepper)
Heat the oven to about 240C (about 460F)
Now this part will depend on what size pizzas you want to make, I usually make 4 large rectangular family size pizzas that is enough for supper with left overs for packed lunches the next day. But you could also make about 6 thin crust round pizzas, or 4 thick crust round pizzas. It just depends on your taste.
For my family I take the dough and divide it into 4 equal parts. Each quarter gets rolled out (use some plain flour to dust the counter so the dough won't stick) to the size of my baking sheet. It works best to put the dough on the baking sheet (or pizza tin) before you start adding the toppings.
Spread the pizza base with some tomato puree, sprinkle over tons of cheese (I use mozzarella and cheddar mix) and now just go nuts and add all your favorite toppings.
Bake in a pre-heated over for about 8-10 min (but this depends on your oven so keep an eye on it).
When the base is cooked and the cheese all melted, take it out, slice it up and dive straight in - Yummmy!
More ideas with dough
This dough can be frozen raw so you don't need to use it all at once, when you need it just take it out the freezer the night before and let it stand in a warm place to defrost completely and use as normal. You can use the prepared dough to make a ton of other bread bakes.
- Roll it out, sprinkle with some garlic, olive oil and chopped parsley then bake in a hot oven for a delicious garlic bread that is just perfect with a salad or soup.
- Break off golf ball size pieces of dough, stretch them flat with your hands and then deep fry in hot oil till golden brown on both sides. In south Africa we call these Vetkoek (fat cakes) and in Alaska they are known as fried breed. They can be eaten as is or cut open and stuffed with savory mince, for a sweet treat eat them with your favorite jam.
- Mix a teaspoon of dried herbs and some chopped bacon into about half amount of the dough, then press it into a deep baking dish, sprinkle with cheese and bake at about 200C (390F) till done. Serve with a Greek or Italian salad for a delicious light lunch.
Jun 6, 2010
Something new
I decided I need to try out at least one new recipe every week. Baking helps me to relax so on the one hand it will be a great way to make some 'me' time and on the other hand I will be able to expand my current catering menu.
This week has been a bit hectic but on Friday I finally got down and tried out the Lemon Meringue Cupcake recipe I have been dying to have a go at for quite some time. They were delicious and my only complaint is that the recipe only makes a few small ones, next time I will have to double it.
Its a very light and spongy cupcake topped with lemon butter (or lemon curd) and a little mini meringue. I think I will also make the meringue a bit bigger next time and put them on just before serving to help keep them as crispy as possible.
Jun 1, 2010
The big search
I have been looking for a tiny daisy (or any flower) shaped cutter for quite some time now and yesterday I spend the day going from shop to shop to see what they have but, still no luck. The only good news is that one of the shop assistants gave me the name and number of a shop in another area that is suppose to have what I’m looking for, so there is still hope that I will find it.
I have a special request from one of my FaceBook friends who is looking for the Microwave Brownies recipe that I use to have on my old web site, so this is specially for Aiden and anyone else who is in need of a sweet treat today. I got this recipe from my mother-in-law and it is a brilliant recipe that can be made in minutes and is perfect with a cup of coffee or a glass of cold milk – enjoy!
Microwave Brownies
I love making these for the kids during the school holidays; they are super quick and so yummy that they will disappear in seconds.
Ingredients:
120g Margarine
150g Brown Sugar
1 Egg
15ml (1 tbs) Milk
5ml (1 tsp) Vanilla
150g Cake Flour
2 tbs Cocoa
3 ml Baking Powder
1 ml Cinnamon
To make:
- Cream butter and sugar.
- Add egg, milk and vanilla to butter mix.
- Sift dry ingredients and add to the batter.
- Lightly press brownie mix into a 20cm square glass (or any microwave) dish.
- Microwave on full power for 5 to 7 minutes.
- Cut into squares and let stand in the dish for a few minutes before turning out to cool.
Extra Ideas for Brownies :
- Add some chocolate chips or dried cranberries to the batter before cooking for a special treat.
- To keep the kids busy make some butter or glace icing (just mix tepid water and icing sugar to a smooth spreading consistency) and let them decorate the squares with sprinkles or jelly sweets.
Subscribe to:
Posts (Atom)
A Touchy Subject
Three words often showing up in the media at the moment is mental health awareness . It seems every time I open a news app or even Facebook ...
-
This week has been amazing, I got six different cake orders - three for this Saturday, two for Tuesday next week and then the last one still...
-
You might think the main ingredient in an ice cream cake would be ice cream, but actually what you need, what your REALLY need is patience, ...
-
After a few weeks of rushing around we had planned to spend this past weekend relaxing at home and catching on a few DVDs, however on Saturd...